Device Configuration Guides
Cisco SPA112 Phone Adapter
The Cisco SPA112 is compact in design and compatible with international voice and data standards. It can be used with residential, home-office, and small-business-VoIP service offerings, including full-featured hosted or open source IP PBX environments.
STEP 1
You must first determine what IP address it received. To do this, you need to pick up the phone attached to the Line 1 jack and dial: **** (four asterisks)
then dial: 110 #
and you will be told the IP address of your device (e.g. 192.168.0.100).
STEP 2
Go to any browser equipped computer on your network and enter the address: http://<IP ADDRESS>/(where <IP ADDRESS> is replaced by the address that was given to you in STEP 1.
STEP 3
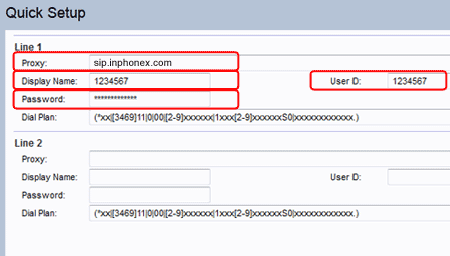
Click on the “Quick Setup” button near the top left side of the screen.
STEP 4
You need to modify only a few parameters from the factory default. They are listed here:
Proxy: sip.inphonex.com
Display Name: Enter your full name, this will show up as part of your caller ID.
User ID: Enter the phone number you chose when you signed up for InPhonex service.
Password:Enter the password that you chose when you signed up for InPhonex service.
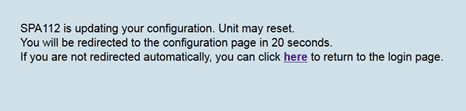
Click “Submit” at the bottom to save your changes. You will see the following screen:
| STEP 5 From the main menu, click Voice, then click Line 1.
|
| STEP 6 Click “Submit” at the bottom to save your changes. |
| STEP 7 Make calls! |